|
|
|
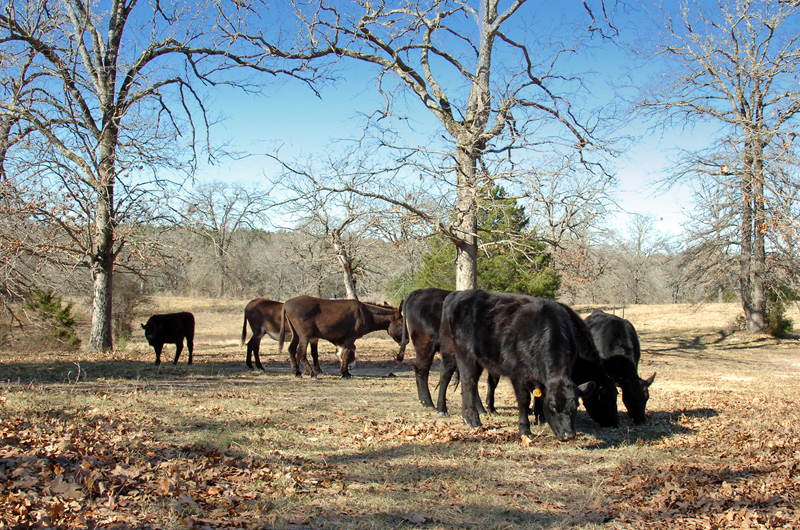
Winter
Grazing
Adobe
Camera Raw ...
It's
not just for Raw files, it works like
magic on Jpegs too! Did you
know that you can easily correct
Exposure, White Balance, and much more
on any Jpeg picture from any digital
camera using Adobe Camera Raw
software (Version 4 and newer) for
Windows or Mac that's included free
beginning with Photoshop Elements 5 or
newer (Windows), Photoshop Elements
4.01 or newer (Mac), Photoshop CS3 or
newer, and all versions of Photoshop
Lightroom. Adobe
Camera Raw is easy to use, intuitive,
instantly responsive with its on-screen
adjustment previews, and most
importantly, non-destructive with your
original Jpeg files. Camera Raw
adjustments and corrections are not
"burned in" to the original pictures,
they are retained as tag files that
accompany and modify the original files
when they are opened into
Photoshop. Similar
to working with Raw files, changes made
to your original Jpegs in Camera Raw
can be undone and returned to their
original state at any time thereafter,
with the original Jpeg file information
remaining untouched. Because of
this, you can now consider your
original Jpegs to be like digital
"negatives" for use as a lifetime
source for future post processing and
printing. With that in mind, it's a
good idea to have a long term
cataloging plan before you copy your
original pictures from your memory
cards to your hard drive so you can
easily find them in the future. It's
wise to make permanent backups of your
original files in another location (CD,
DVD, external hard drive, etc.) in case
something bad happens to your computer.
You might even want to create your own
website to showcase your photos.
(That's how I got started with
Lonestardigital.com). Having your own
website gives you your own private
space in a remote website hosting
server as another place to store your
backups. Prior
to Adobe Camera Raw version 4
(published in 2007), Jpegs that
needed White Balance or Exposure work
were difficult to correct, requiring
strong Photoshop skills and time
consuming work to get acceptable
results. Easy
Exposure & White Balance correction
was the main reason I switched from
Jpeg to Raw back in 2001 when Nikon
Capture 2 software was introduced with
its user friendly White Balance and
Exposure Compensation tools.
Three years later, my excitement
about further industrywide improvements
to Raw conversion software motivated me
to publish a short web article
titled "Why
shoot
Raw?". As time
went on, I continued shooting Raw
because of the technical processing
advantages and the enhanced quality of
the images they provided, but I missed
the practical side of shooting Jpegs.
Dual
format shooting options became standard
in later model high-end cameras,
providing both a Raw and Jpeg file of
the same picture. This gave me the
opportunity to enjoy the best of both
worlds. I could share, view, or print
the Jpeg copies right out of the camera
anywhere & anytime, and still have
the Raw files for advanced post
processing. But
dual format also means fewer total
pictures per memory card because of the
space taken by the additional Jpeg
files. And it takes considerably longer
to transfer the dual set of Raw plus
Jpeg picture files into a
computer. So
should you shoot Raw? Jpeg? Or
both?? If you
want the absolute best image quality
your camera can deliver, shoot
Raw. If you
prefer the simplicity & ease of
working with Jpegs, Adobe Camera Raw
can now give you nearly all of the
technical processing abilities of a Raw
file. If your
camera can shoot Raw plus Jpeg at the
same time, do it. Even if you don't
want to work with Raw files now, save
them for the possibility that one day
you might make the change. Your
experience working in Camera Raw will
make it easy. And then you can go back
to your old photo archives, dig out the
Raw versions, edit
photos,
and make your favorite pictures even
better! More...
(The complete Lonestardigital article
on working with Camera Raw In Photoshop
Elements, Photoshop, and Lightroom can
be found under "Photoshop Articles" in
the main menu.)
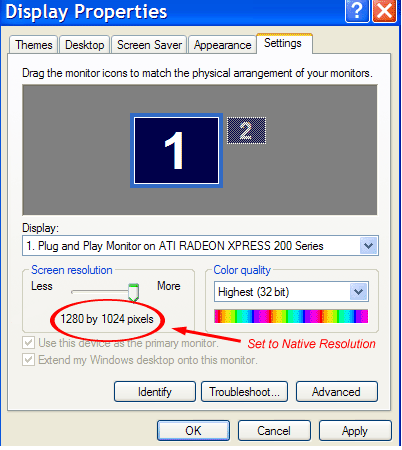
View
the best display
quality possible All
LCD panels are built
with a fixed quantity
and ratio of display
pixels. This fixed
quantity and ratio is
called native
resolution.
Native resolution is
the maximum
resolution an LCD
panel can display.
Generally speaking,
the larger the LCD
panel, the higher the
native
resolution. Be
sure your computer's
display screen
resolution is set to
match your LCD
panel's maximum
native resolution.
When this is done,
your LCD panel will
perform exactly as it
was
engineered. Yes,
you can choose
a different
resolution setting,
but it will degrade
your display quality.
In many cases, what
people consider to be
a poor quality LCD
monitor or laptop
screen is simply the
result of displaying
other than its full
native resolution.
That's because the
output pixels don't
line up perfectly
with the screen's
pixels and the
details become
slightly
blurred. All
website content copyrighted, all rights
reserved |