|
|
|
Magenta skin
tones, cyan casts, sallow tones, and weak
looking colors have troubled D1 users since day
one.... Here's an easy, reliable fix. This two stage
process, using Adobe PhotoShop (full version),
will brighten your day and make you feel glad
that you have a D1. It's good for "people
pictures", pets, wildlife, landscapes, product
shots, sports, flowers, architecture & real
estate work, whatever. (Pictured below
are screenshots from Adobe PhotoShop) Stage
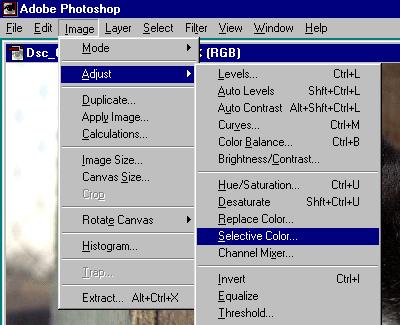
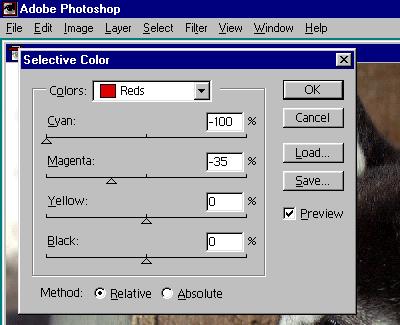
One: Screenshot
shows location of the "Selective Color"
adjustment. Under
"Reds" (only), adjust the Cyan to minus
100% and the Magenta to minus
35%. Note
that the "Relative" method
checked. Click
on "OK" when done. Stage
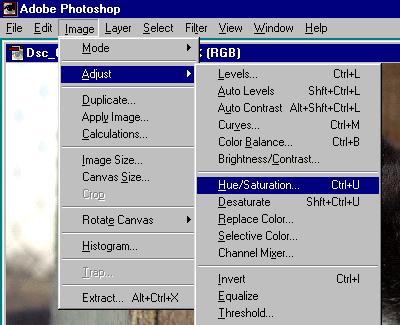
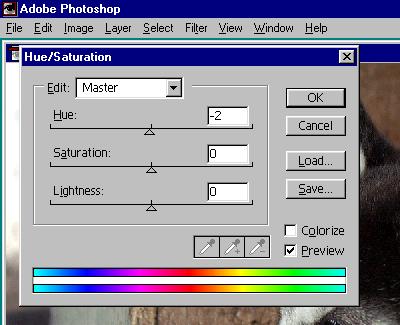
Two: Screenshot
shows location of the "Hue/Saturation"
adjustment. Under
"Master" (only), adjust the Hue to
minus 2. Click
on "OK" when done.
That's
it. Nothing else
required. Before
& after samples using the procedure
- Before: Magenta
and cyan tones to skin. Flat, dull,
& off-colored reds. (Click
picture for 1200 x 787 pixel
view) After: Reds
pop back to reality. Skin tones,
too. Note
that the bad tones are corrected, but
the picture's other colors are
unaffected. (Click
picture for 1200 x 787 pixel
view) Before: Sallow
and cyan cast to the whole picture.
Yukky skin tones. Greenish tint to the
surfer's hair. (Click
picture for 1200 x 787 pixel
view) After: Bingo. (Click
picture for 1200 x 787 pixel
view) |

.jpg)
.jpg)
.jpg)
.jpg)