|
|
|
Contrary to
popular belief, smaller lens apertures (with
their greater depth of field) don't necessarily
result in sharper pictures. When the negative
effects of aperture diffraction begin to
outweigh the positive effects of increased depth
of field, sharpness falls off and fuzziness sets
in. Smaller apertures also cause slower shutter
speeds, often requiring higher ISO settings to
make a shot. Understanding how aperture
diffraction works and relating how diffraction
applies to your camera will help you to take
sharper pictures. Cambridge
in Colour has an outstanding tutorial &
essay about diffraction limited
photography.
Once I took the time to read & understand
it, experiment with the interactive diffraction
table, and work with the diffraction calculator,
I saw how critically important diffraction
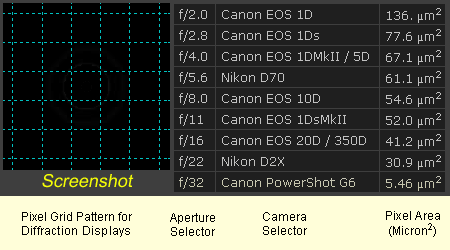
limits were. Below: A
representation of Cambridge in Colour's
interactive visual diffraction table. The grid
on the left side represents the relative pixel
size of the selected camera's image sensor, the
column in the center is an aperture selector,
the next column is a selection list of assorted
digital cameras, and the column on the far right
shows the listed camera sensor's individual
pixel area in square microns. This will all
make more sense when you go
to the tutorial,
read the article, and try out the real
interactive table for yourself. The interactive
table is a bit shy on instructions, here's some
help: Visual Table
Examples: Below:
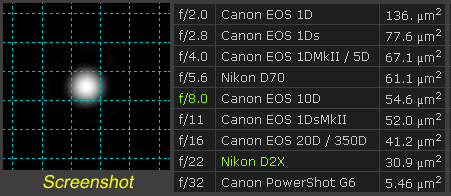
Using a Nikon D2X camera's pixel size
as an example, an f/8 aperture passes a
clean light beam that stays within
pixel boundaries, safely below the
edges of diffraction limits. Picture
this: A nine pixel pattern at f/8 would
look like the sketch shown below. The
central peaks and secondary rings of
the light beams fall within the D2X's
pixel boundaries. No diffraction
blurring or softening will
occur. At f/11
diffraction begins to spill into
adjacent pixels. The
nine pixel pattern at f/11 would now
look like the sketch shown below. The
central peaks of light are within the
edges of the pixel boundaries but the
secondary rings of have begun to
overlap. Some diffraction blurring
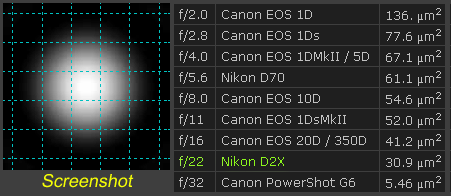
& softening will occur. f/22 is
well over the D2X's diffraction limit.
Serious image quality degradation will
result. And the
nine pixel pattern at f/22 would now
look something like the sketch below.
The central peaks of light strongly
overlap each other, the secondary light
beams have become mush. Below:
Cambridge
in Colour's Diffraction Limit
Calculator
(screenshot) with Nikon D2X values
entered. The visual
tables and the diffraction limit calculator both
show that one should probably avoid anything
higher than f/8 with a Nikon D2X. Looking
through the shooting data on pictures I've taken
with my own D2X, I can confirm that my sharpest,
cleanest looking pictures have all been at f/8
or lower. With this in
mind, I do my best to limit my maximum aperture
to f/8 or lower on my D2X, and f/11 or lower on
my D70 . And I'm not at all reluctant to shoot
wide open.
Additional
Reading Digital
Camera Sensor Sizes - How do these influence
photography? |

.gif)

.gif)
.gif)
