|
|
|
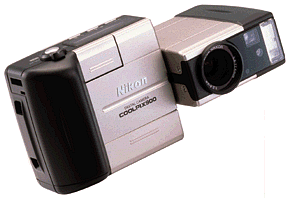
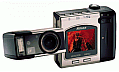
Nikon
CoolPix 900 Digital Camera The "Silver
Bullet" that
Sample
Photos - Click
on the thumbnail pictures below for
full screen viewing Notes
-
All photos taken in the camera's "fine"
quality and full sized resolution
(1280X960) and resized to 640X480
pixels at around 100KB each using
ThumbsPlus.
At this reduced size, very little
quality is lost, and the pictures will
download to your screen quickly.
Spring, 1998 I
Couldn't Wait - After looking at the early press releases,
and reviewing the new camera specifications from
Nikon's site, I had my CoolPix 900
shipped to me via "Next Day Air" the moment they
were released for sale. I couldn't wait! It
looked to me like it was just what I was looking
for in a digital camera. And after hundreds and hundreds of pictures
under a wide variety of conditions, it has
definitely proven itself to be worthy of my
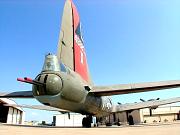
expectations. The Cavanaugh
Flight Museum here in the North Dallas
area was the site for my first test shots. I had
taken lots of pictures there before, and could
critically compare the new Nikon "heads up" with
my Kodak DC-210 and Agfa ePhoto
1280 cameras. The first thing I found with the Nikon was
that most of the compensations and adjustments I
learned through the years with my other digicams
turned out to be unnecessary. For example, low light or high contrast
shooting situations on my other digital cameras
often required major compensations in camera
settings or lighting in order to get workable
pictures. Anticipating similar characteristics with the
new Nikon, I thought I'd be smart and adjust
accordingly before I took any pictures
inside the dimly lit hangars at the air museum.
Wrong. Turns out I didn't need to do
anything. Not knowing what to expect for my first set
of pictures inside the hangars, I took three
pictures of each subject. First, I manually
increased the E.V. (exposure value) by +2.0,
then reduced it to +1.0, then switched to fully
automatic on each subject. (I always disable the
flash to eliminate glare and bounceback inside
the hangars, so I was sure from previous
experiences at the same location with other
cameras that everything would probably be too
dark unless force compensated in advance.) But
it turned out that no adjustments at all were
necessary. The best pictures were all on
"automatic". Wow! - I thought. Outside the hangars, it was "high noon" and
extremely bright. One of my favorite airplanes
was out on the tarmac under the blazing Texas
sun. Usually this is a setup for pretty rough
digital pictures... typically they turn out with
a dark or dull fuzzy look. I left the camera on full automatic, and had
no problems. A crisp, clear, well balanced
picture. Same situation with the "macro" pictures I
tried. Flash disabled, and "automatic" settings
gave me the best results. I've grown to enjoy the camera immensely for
several key reasons:
Set your "manual" record exposure to "spot
metering". Lock onto (half way down on the
shutter button) your primary subject, then
compose your picture. The spot metering will
help the light balance in the picture. The
default metering (and the only metering
available in "automatic record" mode) is
"matrix", which will average in the bright sky
and usually cause a "dark looking" picture. Simple switching back and forth between the
"automatic" mode and programmable "manual" mode
for picture taking. Speaking of the programmable mode
(called "M Record" as opposed to "A Record" for
the automatic mode) - the camera
remembers all the programmable settings
when you turn it off except the flash. So the
next time you turn it on, you won't have to
reenter all your settings. This is
good. Crystal clear LCD reviews of the pictures
taken- and unlike other digital cameras, the LCD
is a pretty accurate rendition of the actual
exposure and balance you will end up with on
your computer after uploading. Focus settings - The ability to quickly and
easily switch between auto focus, fixed focus,
or macro. Autofocus - Use the default
autofocus mode if you want a specific target
sharply focused. While in the autofocus mode,
the camera's sensors constantly work at focusing
on an object in the center of your viewfinder
(or LCD). You'll hear the lens focus motor going
bz-z-z...bz-z-z-z...b-z-z-z.
Press the shutter button 1/2 way down to lock
the focus. If the camera has a stabilized
focus, a "solid green light" on the right side
of the optical viewfinder frame lights up and
"stays solid green". (The little green light is
easily seen) Don't bother taking a picture if
you have a "blinking green light". (And the
camera will let you take one even if
blinking) If the light is blinking, the
camera isn't properly focused, and your picture
will probably be junk. Out of focus. Blurred
looking. Fuzzy. Macro - Extreme close-ups. Also
falls under the exact same "blinking green
light" rules as normal autofocus. Use only for
subjects around 8" to 20" distance from the
camera. I've found I get sharper pictures while
in macro by backing away slightly (towards the
20" limit) and then "zooming in" to frame my
subject.
General Information - "Picture storage" information with
CompactFlash Disks in the Nikon 900 using 1280 X
960 resolution - At "fine" quality,
approximately 1 & 1/2 pictures per megabyte.
At "normal" quality, approximately 3 pictures
per megabyte. And at "basic" quality,
approximately 6 pictures per megabyte. In the
"real world", the camera will take a lot more
pictures than the estimated capacities I've
listed. It all depends on how much "digital
information" is in each picture. Lots of colors,
depth, and detail take up "more bytes". And the
published capacity estimates are pretty much
based on "worst case scenario". (The same
principle applies to all digital cameras) "Formatting" your CompactFlash Disks - I
strongly recommend reformatting your memory
cards inside the camera before
using them. Although all cards come generically
"pre formatted" and will work "as is", I have
found enhanced camera performance by formatting
memory cards directly to the camera's operating
system. Improved shutter response and picture
processing times. The Nikon 900 has a menu item
specifically for this. In fact, I never use the
"erase all" option if I need to clear a memory
card, I simply reformat the card inside the
camera. (Again, this principle applies to all
digital cameras that offer a "format"
option.) The in-depth camera manual on the "Reference
CD" is excellent and very comprehensive. I
printed the entire 77 page manual on my inkjet
printer and set it into a $2.50 discount store
binder. This has been great - all the answers
for camera operations and functions are right in
front of me to refer to if I have a question
instead of having to browse through the CD on my
computer using Adobe Acrobat. Battery life has been what I consider to be
"very good"... But I don't use throw-away
batteries. I only use the rechargeable Nickel
Metal Hydride (NiMH) batteries. (I keep 3 sets,
just in case I go crazy and shoot zillions of
pictures.) I often take 40 - 50 shots at a time
on a single set of batteries when I'm in the
mood to take pictures, and still have power
remaining. This also includes reasonable time
for playback reviews and pre-shot position
adjustments. And that's even when I leave my LCD
on all the time. (Which I usually do.) So before
you get too frustrated with the battery
situation, get NiMH's and a charger. Also, I don't recommend battery power to
upload pictures to the computer. Not only does
it harshly drain the batteries, it's a very slow
process. I strongly recommend a "card reader"
for picture transfer. I use an internal PCMCIA card reader,
but there are also many external card
readers available that simply plug into your
computer. Neither type require any of your
camera's power supply. External card readers are
FAST. Internal card readers are almost
instantaneous! If you can't get a card reader, get an A/C
power supply to upload your pictures to the
computer with the cable interface.
Want Wide
Angle? Changes on
the updated "900s" model - introduced in October
1998 Using exactly the same optics and picture
taking "heart and soul" as the original 900,
Nikon has added a few enhancements. (As you can
see, there's no reason to panic or feel "left
out" if you have an original 900.)
|