|
|
|
Nikon
CoolPix 990 New features and
beefed up construction show Special
features include -
What's
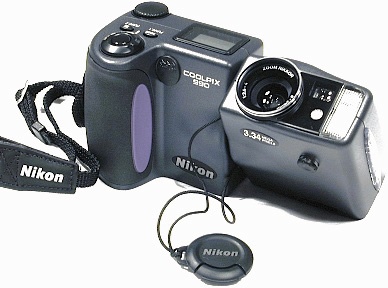
in the box? (1)
CoolPix 990 Camera (1)
Lexar 16MB 8x CF Memory Card *The Software
CD-ROM includes NikonView Version 3, Altimira
Group's Genuine Fractals 2.0 LE, Canto's Cumulus
5.0 LE Image and Asset Management Software,
IPIX's Immersive Imaging Software, and QuickTime
Video Version 4. *The Reference
CD-ROM includes Adobe Acrobat Reader 4.0,
Instructions for Using Nikon View Version 3, and
Nikon's "Guide to Digital Photography" (Online
Camera Manual for the CoolPix 990). *Note that
unlike the CoolPix 800, 900, and 950, the 990
does not come with a soft case.
Sample
Pictures Click
on the previews below for a 1024 x 680
pixel full screen jpeg image view. "Beyond
Point & Shoot" Adventures
with the CoolPix 990
Macro photography -
Magazine reviews, web reviews, newsgroup
discussions, e-mail, and more... everyone talks
about the awesome macro abilities of the Nikon
990. I wholeheartedly agree - this camera is a
natural at macro photography, and doesn't need
any 'extras' to take dramatic, sharp extreme
close-ups. Some Nikon 990 users have difficulty locking
in on a macro focus. In most cases, this results
from having the camera at a wide angle lens
position. The macro focus works best if the
camera lens is not set at full wide angle
position. There's a "sweet spot" for the macro
setting on the 990, it's indicated on the LCD
screen by the flower icon turning yellow when
the camera is zoomed into its best focal length
range. If you're too close for the desired field
of view at the zoomed lens position, back away
from the subject rather than zoom the lens out
to make your composition adjustment.
Available Light
Photography* using the 990's adjustable
ISO (*Also known as "natural light", "existing
light", or other similar descriptions of
flash-free low light photography.) The CoolPix 990 does very well in normal
outdoor lighting, and also does well as indoors
with the automatic flash. But I also like to take indoor available
light pictures... They're so 'natural'
looking. They can capture the look and feel of
"what you see" in dim or subdued lighting
without the harshness often resulting from flash
photography. They can be difficult, though. At 'normal'
camera settings, available light photography
means slower shutter speeds. Any picture taken
slower than about 1/30th of a second will likely
be blurred unless the camera is tripod mounted
or in some other way held relatively rock-solid.
And then, the subject has to be virtually
motionless, too. The only ways to get faster shutter speeds
are to increase the lens opening size (aperture)
to let more light into the camera, or to
increase the sensitivity of the camera using a
higher ISO setting. Increasing both are
necessary at times to reach a desired minimum
shutter speed. The adjustable sensitivity of the CoolPix 990
is a simple and straightforward way to achieve
faster shutter speeds by increasing the ISO
(film speed equivalent) of the camera as
necessary. Changing the camera's sensitivity to a higher
ISO setting will lessen the quantity of light
necessary to take a picture. Shutter speed will
be faster, and at a direct mathematical ratio.
As an example, with the aperture (lens opening
size) constant, if the camera required 1/16 of a
second to expose a picture at ISO 100, it would
only require 1/32 of a second at ISO 200, or
1/64 of a second at ISO 400. Double the
sensitivity (ISO number), half the quantity of
light required. And faster shutter speeds lower
the risk of blurred pictures. Thus, by merely
increasing the ISO sensitivity settings, the
risk of blurred pictures in low light conditions
can be reduced. There are plenty of other situations where
the use of adjustable ISO can be helpful: Comments on ISO -
Exposure Priority (Shutter
or Aperture Priority) Exposure priority options give you the
ability to capture a race car without blurring,
or have the background of your picture look as
sharp as an object that's only 10 feet away from
you. It can get you a focused, crisp view of
your primary subject and have the background be
faded and blurred looking, "in the background".
It can catch the splash of a swimmer in mid-air.
It can give just a "slight blur" to a runner
against a sharp, crisp background to give a
sense of speed. Setting exposure priority tells the camera's
internal processor to "look at me first". With a
priority setting made, the camera then adjusts
its shutter speed (if aperture priority was set)
or aperture (if shutter priority was set) to let
enough light in to expose the picture
properly. You can't set both as "priority" at the same
time. (It would eliminate the automatic
exposure.) That's because automatic
exposure is a function of aperture (how big of
an opening the light passes through) and shutter
speed (how fast the shutter opens an shuts to
let the light through the aperture). If you
manually controlled both, you would no longer
have automatic exposure. There are three primary reasons for using
exposure priority: Stop-action pictures. Use faster shutter
speeds as your "priority" setting. Controlling depth of field. By using
aperture settings as the "priority", you
can increase or decrease the range of sharp
focus (depth of field). To reduce the likelihood of blurring from
"camera shake". Some people have a hard time
holding a camera rock steady when pressing the
shutter button. Also, on telephoto shots or
extreme close-ups, even slight camera movement
is accentuated, resulting in blurred pictures.
Manually setting shutter speed is a way to deal
with "camera shake". *Rule of thumb to prevent
"camera shake" - Set the shutter speed to
around (1/focal length) of a second or faster.
In other words, if the lens is at full wide
angle position (38mm), be sure to have at least
1/30 of a second. At full optical telephoto
(115mm), be sure to have at least 1/125 of a
second as your shutter speed. If the automatic
mode already has you in those ranges, don't
worry about it. Again, remember the basic rule of exposure
priority - With a priority setting made, the
camera adjusts its shutter speed (if aperture
priority was set) or aperture (if shutter
priority was set) to let enough light in to
expose the picture properly. Use each to your intent - if you get out of
bounds enough to cause an over or underexposure
problem, the camera will warn you. * Additional information on using shutter
and aperture control is very nicely covered
in Chapter
One of Dennis Curtin's "A Short Course in
Creative Digital
Photography"
Exposure
Compensation The automatic exposure calculations can be
modified in any exposure mode by using
the 'EV +/-' option. (EV stands for Exposure
Value.) * Note: A well
written explanation of EV (Exposure Values) is
located at Toomas
Taam's Photo Website - Exposure
Values . In 1/3 steps, up to EV + or - 2.0, the
exposure values will be increased or decreased.
This is done by increasing or decreasing shutter
speed and aperture from the standard calculated
values. As such, you can "bracket" exposures on
a subject to ensure the desired results... take
a group of pictures above and below the standard
calculated exposure and you're likely to get it
"just right". Or, in a given situation, if you
"know" from your experience that a picture will
turn out too dark or too light, you can
compensate accordingly. A general indicator of
the expected results can be seen in the LCD
screen before the picture is taken. (And of
course reviewed in the LCD screen afterwards,
also.)
Matrix, Center-Weighted,
or Spot Metering
Add-On Lenses The camera's
28mm lens threads accept readily available
add-on lenses, including teleconverters, fisheye
lenses, 360o
special effects kits, wide angle converters,
monoculars, and full sized telescope
adapters. If you prefer
"factory stuff", Nikon builds high quality 2x
and 3x teleconverter lenses, a fisheye lens, and
a wide angle converter designed specifically for
the CoolPix series cameras. One of
my favorites is Nikon's WC-E24 Wide
Angle Converter Lens. It's compact,
well built, comes with lens caps &
a nice little soft case, and simply
screws directly onto the camera's lens.
(No adapter necessary.) It converts the
standard 38mm equivalent wide angle
view by a factor of .66 to a much wider
25mm equivalent view. As a side effect,
the wide view has a mild fisheye lens
effect, which can add a bit of fun,
drama, or flavor to the look.
(Sample
picture taken with the 990 and the
WC-E24 Converter shown at
left.)
Flash Options External
speedlights can provide a clean, smooth looking
flash that evenly illuminates the area for a
pleasant and natural look, even at close range.
A close range example taken with the 990 and a
Nikon SB-28DX speedlight is shown
below. The 990
has a feature to turn off the camera's
onboard flash while using an external
speedlight. This is important, because
the onboard flash is extremely close to
the camera lens. And the resulting
near-zero angle flashback into the lens
from the built-in flash is the primary
cause of the notorious CoolPix
"red-eye" syndrome. Turning off the
camera's onboard flash is
desirable while using an
external speedlight, because "red-eye"
is seldom a problem with an elevated or
otherwise indirect flash
angle. The
Nikon SK-E900 Multi-Flash Bracket
(shown at left mounted on a Bogen
tripod) is made for the Nikon 900, 950,
or 990. It includes a hot shoe &
cable to allow the use of a Nikon
compatible external speedlight in synch
with the camera. Simple
to assemble and use, the camera / flash
combo can be safely and securely
carried around with one hand, yet
quickly pulled up for steady two-handed
use. Or, it
has a threaded center mount for use
with a tripod, as shown. Yes, the camera
& flash are mounted reverse to what the
SK-E900 flash bracket instructions show, but I
prefer it this way because it elevates the flash
higher to help eliminate "red-eye". The 990 /
SB-28 combo fits quite nicely with this
arrangement.
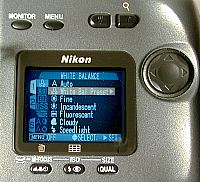
White Balance - Automatic
isn't always the right choice. Digital photos
taken outdoors or with direct flash normally
come out with very good color balance and tone.
The color "temperature" of daylight and direct
flash are very close to each other, and the
camera's normal automatic white balance system
does just fine. Slight problems, if any, are
easily corrected with minor software
tweaking. But it's a
different story for digital photos taken under
poor or artificial lighting conditions. This
goes for all digitals, including the
990. What you see
with your eyes is not necessarily what you get
after the camera processes the pictures...
You'll often get odd colors, unnatural skin
tones, and a yellow, brown, blue, green, or red
cast to your whole scene, even though it might
not appear to be a problem when checked on the
camera's LCD review screen. You think
your pictures are ok, until you actually pull
them up on your computer screen or print them.
These kinds of color problems are difficult
(sometimes nearly impossible) to completely
correct after the fact. The solution is
to preset the camera's white balance using
available predetermined settings, or measure and
preset the values with the camera itself under
existing shooting conditions before you
take your pictures. Available
(predetermined) white balance menu settings
(fluorescent, incandescent, cloudy, flash, etc.)
certainly help to get the right color balance,
but are still a bit of a gamble. On the other
hand, measured & preset white balance will
get it right - consistently. Some pro digital
photographers measure and preset white balance
wherever they shoot - outdoors, indoors, bright
sun, shade, whatever... and carry a special
"white card" (available at better camera stores)
with them at all times just for that purpose.
I personally
don't go to that extent, but I do use the
back of my business card, a white envelope, or
whatever I have handy that's mostly white (a bit
of print here and there doesn't affect the
reading) for a quick & easy reference for
the camera to measure & preset white balance
on most of my inside photography. Reality
- Measured white
balance preset options are available on most
good digital cameras, but rarely used. Even
those photographers who understand the need for
accurate white balance don't like to mess with
it because it can seem like such a hassle... Too
many buttons to push, too complicated for
practical use. Good News -
The CoolPix
990's preset & measure white balance option
is fast & easy to use, thanks a simple menu
procedure using the new 4-way multi-selector
rocker switch on the camera's back. Once you use
it a few times, it's a cinch to
master. The procedure
goes like this: While
in the M-REC
shooting mode, Done. When you're
finished shooting, I recommend resetting the
White Balance back to
AUTO,
for obvious reasons... (like forgetting that you
left the White Balance preset on a no longer
valid white point.) Example
- The available lighting for this scene
was a combination of fluorescent strip
lights and natural sunlight filtering
in through the showroom windows. A
near-guaranteed problem... Test
shots using regular auto, fine,
fluorescent, incandescent, cloudy, and
flash white balance settings all
produced muddy looking, tinted (or a
combination of both)
results. But the
measured white balance using the "White
Balance Preset" feature delivered this
picture, with accurate, crisp,and clear
colors.
Good books
on digital photography are hard to find...
here's one! Peter
iNova's "Mastering Nikon Compact
Digital
Cameras"
is primarily written for owners of the
popular CoolPix 950 & 990 series
cameras, and carries a wealth of
extremely useful, accurate &
interesting knowledge applicable to all
kinds of digital photography.
Special
Adobe PhotoShop techniques &
filters will please (and surprise) even
the most seasoned digital veteran.
There are 245+ filter settings included
with the book, preformatted as Adobe
PhotoShop Actions for your use in a
wide range of color correcting or
special effect situations. No
matter what kind of digital camera you
have, this book's a winner. And if
you have a CoolPix 990 it's a
must!
Nikon CoolPix
990 Specifications -
CCD 0.8475
inch (diagonal measurement) High
Density CCD. Image
sizes Full-sized
@ 3:4 Aspect Ratio 2,048 x 1,536
pixels Lens
3x
Zoom-Nikkor Autofocus: Contrast-detect
TTL AF Focus
modes: 1)
Continuous AF mode (when using LCD
monitor) Shooting
distance: 11.8
in. to infinity Optical
viewfinder: Real-image
zoom viewfinder; magnification:
0.4–1.1x LCD
monitor: 1.8-in.,
110,000-dot, low-temp. polysilicon TFT
LCD Auto
OFF mode: 30
sec.; can be set manually (1/5/30
min.) Storage:
File
format: Compressed JPEG or Uncompressed
TIFF Shooting
modes: 1)
Fully automatic (A-REC) mode Shooting
menu: 1)
White balance Capture
modes: 1)
Single Exposure
metering: 4-mode
TTL metering - Shutter:
Mechanical
and charge-coupled electronic shutter
- Aperture:
7-blade
iris diaphragm Exposure
control: 1)
Programmed Auto with Flexible
Program Sensitivity A-REC
Mode: Approximately 80 Exposure
range: EV
-2–+15.5 (W), EV -0.8–+16.7
(T) (ISO 100 equivalent) White
balance: 1)
Matrix Auto White Balance with TTL
control Self-timer:
3 or 10
second duration Built-in
Speedlight: Guide
number: 30 (at ISO 100, ft.) Flash
modes: 1) Auto
Flash External
Speedlight: Multi-flash
sync terminal connects to external
Nikon Speedlight
SB-28/28DX/26/25/24/22s through the
Multi-Flash Bracket Unit SK-E900;
Built-in Speedlight can be turned off
when using an external Speedlight.
Playback
menu: 1) 1
frame Delete
function: Deletes
all frames or selected
frames Interface:
1) USB
interface Video
output: NTSC or
PAL (selectable) I/O
terminals: Power
input Power
requirements: 4 -
1.5V alkaline "AA"-size (L40)
batteries* Battery
life: Approx.
1.5 hrs. when using LCD monitor and
four 1.5V LR6 alkaline "AA"-size (L40)
batteries at room temperature
(68°F). Dimensions
(W x H x D): Approx.
5.9 x 3.1 x 1.5 in. Weight Approx.
13.1 oz. |
||||||||||||||||||||||||||||||||||||||||||||||||||||||||||||||||||||||||||||||||||||||||||||||||||||||||

.jpg)
.jpg)
.jpg)
.jpg)
.jpg)
.jpg)
.jpg)
.jpg)
.jpg)
.jpg)


.jpg)
