|
|
|
Agfa
ePhoto 1680 Digital Camera Megapixel
resolution adds to picture
quality. Exposure priority
adds exciting options. Click
on the thumbnail pictures below for
full screen viewing -
Comments
as applicable can be seen when you
bring up the full screen view of each
picture.
Key features
Exposure
Priority O.K. - So if you're not a professional
photographer or a serious "camera bug", you're
probably saying "I think I've heard of it, but
what is it?" Or, "Why should I even care when
all I really want is a nice, sharp picture?" Yes, it is truly wonderful to
have a camera you can put on "automatic" and get
a good picture by just pressing the shutter
button. Auto focus, auto exposure, just 'point
& shoot'. But there are times when
"automatic" just won't get what you see in your
"mind's eye" when you take a picture. Blurred
shots from movement. Backgrounds out of focus.
Something "missing" to the feel of the
picture. All of the better digital cameras have some
'manual setting' options to adjust for
conditions that might be a little too bright or
too dark. Some have focal point options. But
that's about it until you step up to the $2,000
to $30,000+ range of digital cameras. A couple of currently produced lower priced
cameras have preset "sports" or "portrait"
settings that hit the edge of exposure priority.
And that's nice... if the "good" high resolution
digital cameras even had these options, I
might not be all that excited about the Agfa
1680. What makes the 1680 so special is the wide
range of settings you can make in these
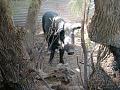
areas. Exposure priority gives you the ability to
catch your jumping puppy without blurring, or
have the mountains in the background of your
picture look as sharp as the object that's only
10 feet away from you. It can get you a sharp,
crisp picture of your primary subject and have
the background be "in the background". It can
catch the splash in the swimming pool in
"mid-air". It can give just a "slight blur" to a
runner against a sharp, crisp background to give
a sense of speed. It can capture the look and
feel of what you see in dim or available light
without the harshness often resulting from flash
photography. Setting exposure priority on the 1680 means
that the camera tells it's internal processor to
"look at me first". With a priority setting
made, the camera then adjusts it's shutter speed
(if aperture priority was set) or aperture (if
shutter priority was set) to let enough light in
to expose the picture properly. You can't set both as "priority" at the same
time. It would eliminate the automatic exposure.
That's because automatic exposure is a function
of aperture (how big of an opening the light
passes through) and shutter speed (how fast the
shutter opens an shuts to let the light through
the aperture). If you manually controlled both,
you would no longer have automatic exposure. To ensure proper exposure, the 1680 will
distinctly show a red warning symbol with a
"+" or
"-" sign in the LCD
screen if your priority setting is likely to
cause an over or underexposure. If you see the
warning symbol, you can redo your priority
settings accordingly. Thus, even with "exposure
priority", there is a built in safeguard for
achieving good quality photos. There are three primary reasons for using
exposure priority: Again, remember the basic rule - With a
priority setting made, the camera adjusts it's
shutter speed (if aperture priority was set) or
aperture (if shutter priority was set) to let
enough light in to expose the picture
properly. Use each to your intent - if you get out of
bounds enough to possibly cause an over or
underexposure problem, the camera will warn
you. Comments in my sample pictures will tell you
more about the practical use of exposure
priority. Remember, the camera also has a fully
"automatic" setting, too. (If you don't want to
use manual overrides.) Guidelines
for exposure priority settings on the
1680 1/2
Second: Camera support a must.
Recommend using time delay shutter
release to absolutely eliminate
camera movement. Use for dim
existing lighting conditions. Use
only for inanimate and absolutely
stationary subjects. Not for use
with "anything that breathes or has
a pulse". Long shutter time usually
sets a small enough aperture to give
excellent depth of field. 1/4
Second: Camera support a must.
Recommend using time delay shutter
release. For dim existing light
conditions. This is as slow as you
should ever go while taking a
picture of a posed, "I promise to
hold absolutely still for the
picture" person. Even then, a
possible light blur from the
slightest movement. 1/8
Second: Camera support a must.
Recommend using time delay shutter
release. For dim existing light
conditions. A better speed for
taking a picture of a posed person.
(Less likely to get a blur from
slight movement.) 1/15
Second: Camera support still
required for most people... some
"rock steady" photographers can
handhold the camera at this speed
for normal or wide-angle shots. For
dim existing light
conditions. 1/30
Second: Slowest recommended speed
for hand-held use. Good all-around
existing light shutter
speed. 1/60
Second: Good for outdoor pictures
under "less than ideal"
conditions... Cloudy days, subjects
in the shade, backlighted subjects.
Also useful for brighter existing
light scenes. Less chance of "camera
shake" blurring in existing light
conditions than at 1/30
second. 1/125
Second: Best all-around outdoor
daylight picture shutter speed.
Gives enough aperture in most cases
for good depth of field. Generally
stops blurring from camera shake,
people walking, kids playing, and
other moderate action. 1/250
Second: Good for stopping moderately
fast action - Average running,
swimming, or bicycling speeds,
active animals, moderately fast
sports, things like that. Pretty
much eliminates camera shake
blurring. Has more forgiveness for
motion, but will often have less
depth of field than 1/125
second. 1/500
Second: The fastest speed you can
set on the 1680. Good for stopping
fast action like running horses,
jumping dogs, moving cars in
traffic, basketball players, fast
moving bicyclists, etc. Stops all
but the fastest of action. As with
1/250 second setting, might have
reduced depth of field in all but
the brightest of
conditions. "Medium
- f/5.6 actual. Good for a
medium range of sharp focus around
your primary subject. "Small"
- f/8.0 actual *. Gives better depth
of field and overall image
sharpness.
Sometimes, even with the best of plans and
intentions when you snap your picture, it comes
up as pure junk. You can see it on the LCD
screen as soon as it begins to process - Blurred
movements, closed eyes, missed "target", and so
forth. You know it as soon as you see it. Press the "easy pilot" wheel/button while the
picture is previewed on the LCD screen during
the processing time, and processing halts. An
option pops up on the LCD screen, asking you if
you want to stop processing and delete the
current picture. Select "yes", and the picture is deleted on
the spot, returning you instantly to the picture
taking mode. A big time saver, and a big
"megabyte" saver, too. Select "no", and the picture continues
processing. I sure do like this addition to the camera's
operating system.
The Big Threaded
Lens The 46 mm threaded lens allows easy
attachment of add-on lenses and filters. (The 46
mm size is a standard camera size.) You might
need a step-up ring to 49 mm, 52 mm, or even 55
mm to fit certain items, but these are also
readily available. Threaded lenses (wide angle
or telephoto) and step-up rings can be bought at
most larger camera stores. Huge variety of
possibilities for the adventurous.
Useable on any exposure or focus setting, the
time delay is settable at either 5 or 10
seconds. When the shutter button is pressed, a
"countdown" appears on the LCD screen. You can
see 10, 9, 8, 7 ... and so on (or a 5, 4, 3 ...
etc. with the 5 second delay) until the shutter
trips. And when it does trip, you'll hear the
familiar "beep" signal from the camera
confirming that the picture was taken. I often use the camera on a monopod, raised
high over my head for an elevated shot. I can do
this with the timer, and then I can see when the
shutter is set to trip, so I can be sure my
subject is "framed" properly in the LCD screen.
And the "beep" tells me I can let the camera
down to review my work.
The step up to 1280x960 resolution is
significant for two key reasons -
Average boot up time -- around 5 seconds. Shutter response time -- A consistent 3/10
second. Not bad... Average processing time -- 4 to 5
seconds.
|