|
|
|
Better
Performance Put your Adobe
Photoshop Scratch Disk on a different physical
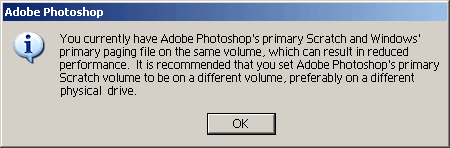
drive. The first time you run Photoshop, you'll
see this info-warning pop up. It's a one-time
warning, most people click OK and never do
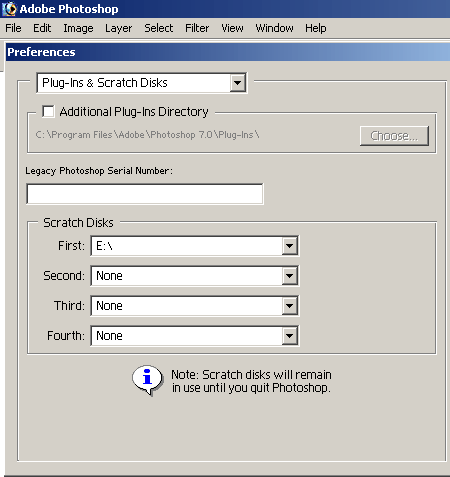
anything about it. Under
Photoshop's Edit/Preferences choices, change the
First Scratch Disk to a different physical drive
with plenty of open disk space. There's no need
for second, third, or fourth scratch disk unless
your first disk is short on available
space. Faster
Startup Disable the
Detect Watermark plug-in (Digimarc). Photoshop
loads quicker and your pictures will open
faster. This tip is straight from Adobe's
official support knowledge database in their
Support
Knowledgebase Document
318243. The Digimarc
plug-in will no longer preload itself when you
start Photoshop, and Photoshop will no longer
scan each image for a digital watermark before
it opens it. Remember, this a "factory
authorized" tip. And it really does
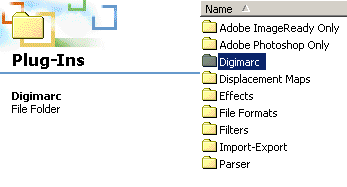
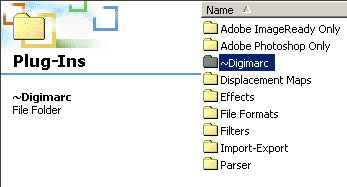
significantly speed things up. Locate
the Digimarc plug-in folder.
You'll
find it inside the Program Files /
Adobe Photoshop / Plug-Ins
folder. Rename
the Digmarc Folder by adding a tilde
(~) in front of the name. This
will disable the Digmarc
Plug-in. Reader
comment: John, I
may have mentioned to you before I am a
retired Navy Photographer's Mate and my
path in film and digital was similar to
yours (except the first digital camera
I touched was the Kodak DCS100). The
tip on speeding up Photoshop by
skipping over Digimarc was great, and
it works fine with CS2 as well. Keep up
the good work! Charles
Hubbard Video
Card Tip Use a video card
with 128 Megabytes or more of Video Ram. (I
personally use a 512 Megabyte video
card.) Read more about
this in Adobe's
Support Knowledgebase Document
331412.
Although the two
Adobe tech articles listed above specifically
refer to Photoshop CS (tip number one) &
Photoshop CS 2 (tip number two) in Windows, both
tips help in all versions of Photoshop & on
all computer platforms. Reader
comment: "I used
your latest tips from your web site. I
put the ~ in front of the directory
name in PS. I already had a video card
with 128mb BUT I bought a ATI 256mb
video card and WOW what a difference.
It's like night and day speed wise.
Please keep sharing your secrets ......
Thanks,
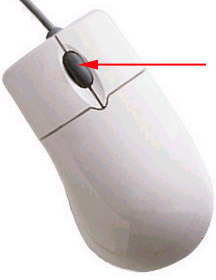
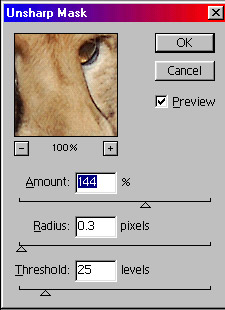
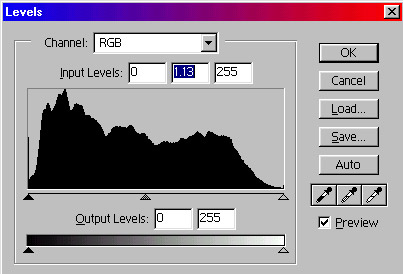
Roy (www.mystudios.com) Wheel
Mouse Tip Use the
wheel (or the little joystick) on your
mouse to change your Adobe Photoshop
settings. Click
your mouse cursor anywhere in the
number box you want to adjust, then
simply roll the mouse wheel forward or
backwards to change the values on the
fly. Much (much!!) faster than dragging
the sliders or entering the numbers by
hand. Works on all open number fields
in working boxes or on the menu bar,
such as Unsharp Mask, Gaussian Blur,
Levels, Brightness, Contrast, Hue,
Saturation, Font Size, Opacity,
Exposure, Pressure, Tolerance, Weight,
Width, etc. For functions that have a
preview box option, be sure to leave it
"checked", and you'll be able to watch
the effects of your changes full screen
as you roll the wheel. For
speedier changes, hold the Shift Key
down when rolling the mouse wheel and
the values change 10 numbers at a time
instead of one at a time. Thanks to
reader / photographer /
DLC
photography
webmaster Don Cohen for pointing this
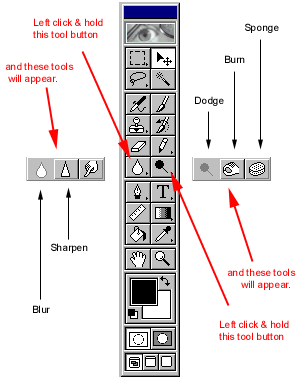
out to me. Toolbar
Tips There's
more to the Photoshop Toolbar than
meets the eye at first
glance. Click
& hold your left mouse button on
nearly any icon in the toolbar and
you'll find additional useful
tools. (Examples
shown at left.) Specialty
Tips Sharpening Lighten
up dark areas Tone
down overexposed areas Quick
& easy tool brush sizing Make
your tools & palettes
disappear Easy
Red-Eye Removal with the Sponge
Tool Need
to insert a genuine Copyright,
Trademark, or Registered Trademark
symbol using the Text Tool (the T
button on the toolbar) into an image or
into your text? Hold the Alt key down
as you type in the following
numbers: |