|
Lonestardigital's
2010 version of its Midtone Luminosity Sharpening
Action* (MTLSA for short) was developed using the
best attributes of all previous Lonestardigital
sharpening actions.
|
*What
is a Photoshop
Action?
An Action is an Adobe Photoshop
process that automatically executes a
series of predefined tasks and
operations.
More
information ...
|

|
Software,
cameras, and image formats supported
- Adobe Photoshop
7, CS, CS2, CS3, CS4, and CS5. (Not
compatible with Photoshop Elements.)
- All makes, all
models of cameras.
- Jpeg, Tiff,
Bitmap, or converted Raw image files*.
Note: The MTLSA sharpening action uses Photoshop
Layers: Photoshop
CS and newer support seither 8 or 16 bit
files in Layers, but Photoshop 7 only supports 8
bit Layered files. If you use Photoshop 7 and
are working with a 16 bit file, you must first
convert it to 8 bits before you use the action.
The 2-Step
Action is
free to
download & use without
restrictions
2-Step is
available in two versions. One sharpens in RGB
Luminosity, the other sharpens in Lab Color's L
Channel.
Why two versions?
Because advanced users have two schools of thought
on color modes & sharpening.
- RGB Luminosity
advocates prefer to sharpen in the image's
original color mode. They are concerned that
there will be some color information lost by
mathematical conversion during the
transformation from RGB to Lab Color and back to
RGB.
- Lab Color
advocates believe that sharpening in Lab Color's
L Channel is the purest approach to sharpening,
and that any color information that might be
lost because of the mathematical conversions
going in & out of Lab color is
insignificant.
With either
version, Photoshop sharpens only the details in an
image, not the colors. This is important, because
sharpening colors can result in unwanted color
shifts or increased color vibrance. RGB Luminosity
and Lab Color's L Channel both exclude the image's
color information during the sharpening
process.
The visual
differences in sharpening results between the two
versions are nearly impossible to see. To me, it's
more a matter of personal preference, much like
comparing Nikon vs. Canon, Toyota vs. Honda,
Chocolate vs. Vanilla, Coors Light vs. Bud
Light.
For what it's
worth, I use RGB Luminosity sharpening when smooth
skin tones are of prime importance, and choose L
Channel Lab Color sharpening when meticulous
details are more important. At 500% magnification,
the RGB version is slightly cleaner looking, while
at the same magnification the Lab version shows a
tiny bit more fine detail (which is sometimes not
too flattering on skin tones).
The 2-Step
Action targets two different midtone zones using
Adobe Photoshop's Advanced Layer Blending.
By using Advanced
Layer Blending, the sharpening is confined to two
unique midtone zones. Midtone sharpening avoids
sharpening along abrupt bright & dark edge
transitions that can cause edge jaggies &
halos.
|

|
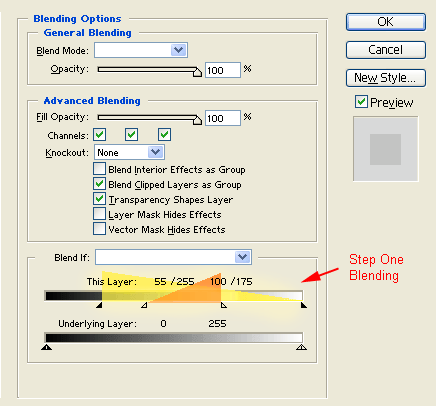
Step
One
Convolution
matrix edge sharpening plus an ultra low
radius unsharp mask extract hidden midtone
details within two overlapping sharpening
zones.
|
|
|
|
|

|
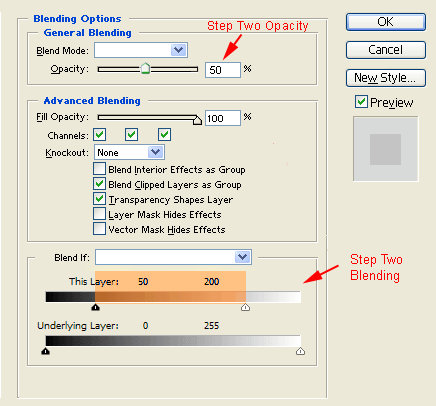
Step
Two
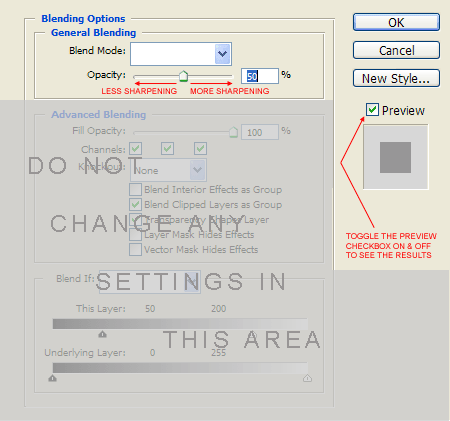
The
blending area is then reconfigured to a
single midtone sharpening zone and the
Layer Opacity is reset to 50%
transparency.
Unsharp
Mask is applied at 100%, 1.0 radius, 10
threshold.
|
|
|
|
How to run the
Texas
2-Step Sharpening
Action:
- With an open
image in Photoshop, press the F11 Key on
your computer's keyboard to automatically run
the standard (RGB Luminosity) action.
- (Or) with an
image open in Photoshop, press the F12
Key on your computer's keyboard to automatically
run the L Channel Lab Color action.
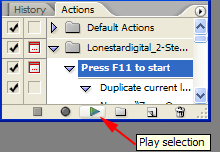
- If you prefer,
you can just go to the Photoshop Actions
Palette,
click on the Action start line, then click on
the "Play Selection" button.

|

|
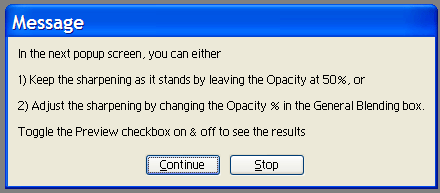
Everything
will then proceed automatically until this
message screen pops up .
Click on
the Continue button and the Action will
proceed to the next screen.
|
|
|
|
|

|
Final
sharpening can now be adjusted if desired
by changing the Opacity percentage.
Then click
on the OK button to finish the
Action.
|
You should
always check your pictures at 100% view (also
called "actual pixels" or "original size") for the
best analysis of sharpening quality.
- 50% of actual
size is second choice and will display pretty
close to what the picture will look like if it
is printed.
- Other screen
sizes are not recommended for sharpening
analysis. Do not use other than 100% or 50% to
evaluate sharpening.
In-camera
sharpening should be preset to "Normal"
(midpoint strength) or slightly lower. As has
always been the case, "normal" in-camera sharpening
produces images that are generally sharp but still
slightly soft.
- Examples:
I usually set my Nikon D3 and D300 in-camera
sharpening at number 3, which is one notch below
the midpoint.
Other D series Nikon DSLRs (D1 series, D2
series, and D50 through D200) do well with what
Nikon calls "Normal" in-camera sharpening.
For most Canon cameras, I like to set the
in-camera sharpening at one notch below the
midpoint.
All other cameras should do fine with Normal (or
midpoint) in-camera sharpening.
Please do not
be too aggressive with your in-camera
sharpening!
- Aggressive
in-camera sharpening creates unnatural looking
edges, bright or dark edge halos, sharpening
artifacts, and excess noise.
And remember that for in-camera jpegs,
sharpening cannot be reduced in the computer
after the fact.
Unsharpened Raw
files should be pre-sharpened to the in-camera
equivalent of midpoint strength or slightly lower
before running the action in Photoshop.
Download
Links (free
download, free to use)
Download
the Texas 2-Step RGB Luminosity Sharpening Action
v1.1 (atn file)
Download
the Texas 2-Step Lab Color Sharpening Action v1.1
(atn file)
If
you prefer to download a zipped file and extract it
yourself:
Download
the Texas 2-Step RGB Luminosity Sharpening Action
v1.1 (zip)
Download
the Texas 2-Step Lab Color Sharpening Action v1.1
(zip)
How to
load an Action into Photoshop:
|
Applies to
Adobe Photoshop 5, 6, 7, CS, CS2, and CS3.
(Windows or Mac)
|
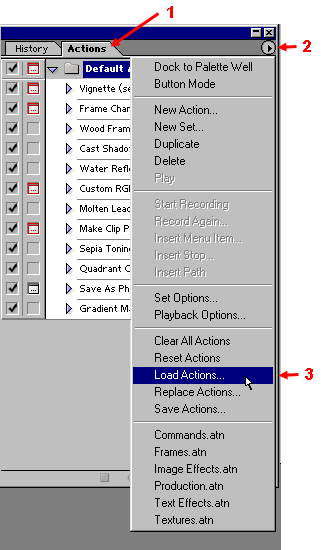
- (1)
Click on the Actions Tab in Adobe
Photoshop.
- (2)
Then click on the arrow button in the
upper right corner of the History and
Actions box. A menu bar will drop
down.
- (3)
Click on "Load Actions..."
|
- Your computer
will pop up with a file locator screen.
- Navigate to
your downloaded Action file, highlight it and
then click the Load button.
- The Action will
automatically load itself into Photoshop's
Default Actions.
|

